 | PIM & Chintaro Cloud Integration Guide |  |
Using PIM with Chintaro Cloud
Thanks to our Chintaro Cloud integration, you can import confirmed inspections directly into PIM, complete with property details and tenant information.
The latest updates make this workflow faster and more seamless, with new features that simplify your inspection process. You can easily download scheduled inspections into PIM, then upload completed reports, maintenance items, photos, and more straight back to Chintaro Cloud. Once your inspections are finished, reports are automatically sent to Chintaro Cloud, ready for follow-ups without any extra steps.
For guidance on setting up Chintaro Cloud with PIM, contact Chintaro Support.
Note: These instructions are for Chintaro Cloud users. If you are using a non-cloud version of Chintaro, please refer to the Chintaro Local Integration Guide instead. |
Contents
- Video Instructions
- First Time Set Up in Chintaro Cloud and PIM
- Scheduling Inspections In Chintaro Cloud
- Prepare For a Successful Import
- Importing Your Inspections Into PIM
- Complete the Inspection
- Viewing Your Inspection in Chintaro Cloud
- Resend Inspection to Chintaro Cloud
- Troubleshooting and Helpful Tips
Video Instructions
Prefer to learn by watching? See the video below or visit our YouTube Channel.
First Time Set Up in Chintaro Cloud and PIM
1. Set up your Parameters in Chintaro Cloud
Before starting, ensure the correct parameter is set in Chintaro Cloud to allow automatic imports into PIM. This setup is only required for Chintaro Cloud users — if you are unsure, contact Chintaro Support to confirm your setup.
Once on Chintaro Cloud, navigate to System Maintenance > Reference Tables > Parameters > PIMWebUpdate and change the Parm Number from 0 to -1 to enable integration with PIM.

2. Enable Chintaro Cloud Integration in PIM
In the PIM app, you will need to enable both Enable Chintaro (1) and Use Chintaro Cloud (2).
First, navigate to Settings > Advanced, Integrations About the App > Enable Chintaro (1).

Enter your Chintaro Company Code when prompted.

If you are unsure of your Company Code, go to System Maintenance > Reference Tables > Parameters. Look under the Webservicedb column in the Parm Text field — your Company Code will appear there, for example chintaro_xyz. If you need help, contact PIM Support.

Then tap Use Chintaro Cloud (2) and enter the password "chintaropim".

Both toggles will remain green once successfully enabled.

You can then choose to import data up to 7, 14, or 28 days in advance. We recommend selecting 7 days.
Scheduling Inspections In Chintaro Cloud
1. Scheduling an Inspection Date
Once your Chintaro Cloud parameters and PIM preferences are set up, you can begin scheduling inspections. From the Home Screen, navigate to Property Maintenance > Inspections > Schedule Inspections.

Filter the screen to show the properties or rooms you wish to inspect — you can filter by Property Name, Suburb/City, or Next Inspection Date. Check the Next Inspection Date column and update any dates as needed by clicking on the field and entering the correct date. You can also adjust the Time if you would like to schedule a specific slot.

Next, select the type of inspection from the PIMReportType (2) column. This determines how the inspection will appear in PIM — for example, a Routine inspection will import as a Property Inspection Report, while an Ingoing or Outgoing will import as a Property Condition Report (PCR).

2. Select or Add a Room Type and Enter Notes
You can double-click a property inspection and select a pre-determined Room Type in Chintaro Cloud. This Room Type can then be matched in PIM to your Property Profiles, allowing inspections to import with the correct pre-defined inspection areas.
If you are working in a team, it is worth agreeing on a consistent set of Room Types across your portfolio. Your System Administrator can go to Home > System Maintenance > Reference Tables > Room Type to edit existing types or add new ones to match the Smart Property Profile names in PIM. Keep in mind that editing an existing Room Type will affect inspections and properties already in Chintaro — if unsure, create a new Room Type to avoid altering existing data.

We recommend taking a screenshot from PIM Settings > PIM Admin > Smart Property Profiles so you can match the name exactly.

The Room Type can also be set from the Property Address, where you can assign a Room Type for individual rooms (2).

Property Info: You can add notes that will be imported directly into the Property Info field in PIM. Use this space to include any helpful context for the Property Manager — for example, important observations or things to be aware of before the inspection begins.

Tip: PIM now shows both the Property Manager and Inspector for each inspection in separate fields, making it easier to see who is responsible for what. Reports can also be updated to include this information for easier tracking. |
3. More Control Over Inspection Types
You can now also select the type of inspection from the Inspection Type (3) column when scheduling from Chintaro Cloud. This allows inspection types such as Vacancy or Asset Inspections to be scheduled and recorded correctly in Chintaro Cloud, while PIM prepares them with the appropriate inspection areas. The default inspection type is Scheduled.
To make use of this, create a new Property Profile in PIM — for example, one named "Asset Inspection" — to match the corresponding Inspection Type name in Chintaro Cloud. This works as a separate layer to the existing Room Type mapping, adding an additional level of inspection categorisation that makes the integration even more powerful and flexible.

4. Process Scheduled Inspections
Once you are happy with your selected dates, Room Types, and any notes you have added, navigate back to Property Maintenance > Inspections > Schedule Inspections. Make sure the Property Manager is set correctly, then either click Select All or tick the Include boxes for each room individually. Click Process Schedule to finalise.
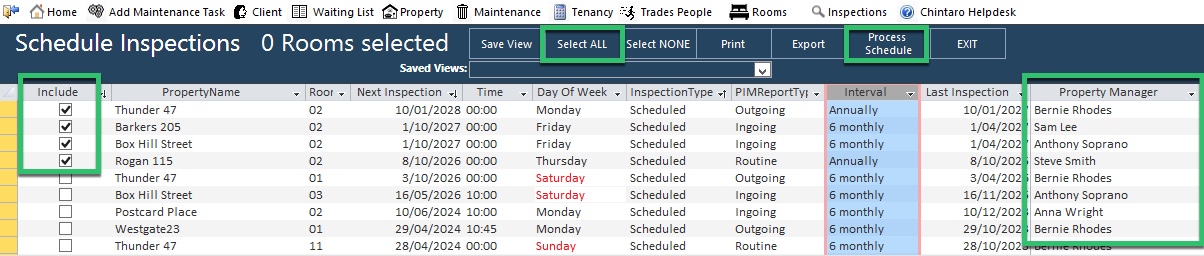
Chintaro Cloud will confirm the number of inspections that have been scheduled.

Prepare For a Successful Import
A few small adjustments in PIM Settings will help ensure exact matches with Chintaro Cloud fields, making imports smoother and more reliable.
1. Set Up Smart Property Profiles (optional)
Smart Property Profiles let you quickly set up inspections for the most common property types in your portfolio — for example, a standard three-bedroom, two-bathroom apartment. With a little initial setup, your existing Chintaro Cloud Room Types can be matched to PIM to allow for a seamless import, saving a lot of time when adding or removing rooms during an inspection.
Add or edit your profiles in PIM Settings > PIM Admin > Smart Property Profiles.

See the Smart Property Profiles Guide for more information.
2. Confirm Inspectors
The inspector name in Chintaro Cloud should match an inspector listed in PIM. If no exact match is found, PIM will assign the inspection to a Default Inspector. Add or edit inspectors in PIM Settings > PIM Admin > Inspectors to ensure all inspections are assigned correctly.

See the Inspectors Guide for more information.
3. Assign a Default Inspection Type
During import, PIM will use the default Inspection Type set in PIM Settings > PIM Admin > Inspection Type, such as Routine or PCR (Property Condition Report).

Importing Your Inspections Into PIM
Next, you will need to download the scheduled inspection data into PIM on your device.
1. Navigate to the Import tab
This is located at the bottom of the app.

2. Import the latest file from Chintaro Cloud
Pull down on the screen to refresh the data files. Once refreshed, tap the latest file to open it.

3. View imported inspections
Your properties will be listed with a colour code on the left. Green indicates a property PIM has not seen before, so it will be treated as a new inspection. Orange represents an existing property, so a Repeat Inspection will be created.

4. Filter and Sort if required
If there are a large number of properties in the imported list, you can use the Filter (1) or Sort (2) options to make things easier to view.

5. Import the inspections
Select the Action button (1) and choose one of the Import options (2).

Note: if you only want to import some inspections, press Cancel, then tap the properties you want to include. A checkmark will appear on the right. You can then choose Import Selected instead of Import All.
6. Confirm the import type
The import will create inspections based on the Room Type selected in Chintaro Cloud where available, otherwise PIM will use the default Property Profile. If you are happy with this, tap Continue.

7. Close the PIM File Import message
Take note of the confirmation message, then tap OK to close.

Complete the Inspection
After importing, your scheduled inspections will be available under the Inspections tab. Go ahead and complete the inspection in the usual way by adding notes, photos, and callout details, then tap Submit Inspection when done. This will push the completed report, all notes, any photos marked for maintenance, and the Maintenance Required, Suggested Improvements, and Our Summary callouts back into Chintaro Cloud.
See our full range of Inspection Guides for more information on conducting inspections.
Mapping Notes from Callouts and Summary Fields to Chintaro Cloud
You can add notes against your inspection areas for Maintenance Required, Suggested Improvements, Our Summary, and Tenant Summary, and these will upload back to Chintaro Cloud automatically.

Viewing Your Inspection in Chintaro Cloud
Once you have submitted your inspection from PIM, you can review the inspection data in Chintaro Cloud by tapping Inspection Reviews from the dashboard. If you need to make any changes to the submitted report — such as adding or removing an inspection area, including another maintenance photo, or updating notes or callouts — refer to the Troubleshooting and Helpful Tips section below.
Reviewing Your Inspection Report, Notes, Maintenance Photos and Callouts
Once submitted, you can review the Callouts (1), Notes (2), Maintenance Photos (3), and the Inspection Report in PDF format (4) in Chintaro Cloud.

(1) Callouts populated from PIM:

(2) Notes from your inspection areas:

(3) Photos marked "Include in Maintenance":

(4) Inspection Report in PDF format (double-click to view):

Resend Inspection to Chintaro Cloud
If you previewed the inspection rather than submitting it, or need to re-send to Chintaro Cloud for any reason, this can easily be done from the inspection home screen.
1. Tap the Reports Folder from the inspection

2. Select Send to Chintaro from Options
From Options (1) on the right, tap Send to Chintaro (2).

Troubleshooting and Helpful Tips
Here are some common questions and helpful tips for the Chintaro Cloud integration.
For PIM-related questions, please reach out to PIM Support. For any Chintaro or Chintaro Cloud-related questions — including locating your Company Code or scheduling inspections — please contact Chintaro Support.
1. Completed inspections not pushing back to Chintaro
Only inspections that were originally imported from Chintaro into PIM will be automatically uploaded back into Chintaro when you use the Submit Inspection function. This sends an email with your completed inspection report and pushes the full inspection — including maintenance notes — back into Chintaro.
If you need to upload a report manually, refer to the Uploading Reports Into Chintaro guide for step-by-step instructions.
For scheduling future inspections, please use Chintaro Cloud — this automatically handles repeat inspections for existing properties, so there is no need to use the Repeat Inspection feature in the PIM app.
2. Updating Inspections in Chintaro Cloud
If you need to update a submitted inspection — such as adding or editing notes, updating callouts, including additional photos, or changing inspection areas — you can make these changes directly in PIM.
After updating in PIM, go into Chintaro and remove the Completed Date from the inspection record, ensuring the Active Inspection box is ticked. You can then use Submit Inspection or Send Inspection to Chintaro to upload the updated record.
Note: If you see the error "You cannot make the Inspection inactive without entering a Completion Date" when ticking Active Inspection, simply tap Exit to leave the screen, then reopen the inspection details and tick Active Inspection again. After this, you will be able to submit your inspection successfully from PIM. |

Was this article helpful?
That’s Great!
Thank you for your feedback
Sorry! We couldn't be helpful
Thank you for your feedback
Feedback sent
We appreciate your effort and will try to fix the article