If you are using the latest version of PIM v4.4.3 (Check your version in PIM Settings) or higher check out our new Camera guide available here.
Photos are an important element of any inspection. They form a visual record and can be used as supporting evidence during a dispute. And with PIM now available on iPhones your pictures are crisp and remember to use your flash in those dark areas!
Luckily PIM uses your device's built-in camera to produce high-quality photos automatically used within the report. All photos are labelled, to provide greater context of where the photo was taken, and an embedded Date/Time Stamp is also available in Settings > PIM Admin > Default Settings > Allow Date/Time on Photos.
These photos can also be exported as individual high-resolution images using the Sharing Reports & Photos option.
So let's look at how to take great photos in PIM. Watch the video below, use the written guide, or head over to our Youtube Channel - Taking Better Photos in PIM.
Getting Started
Expand the relevant Inspection Area (or Sub Inspection Area), you can then tap directly on the Camera symbol on the right-hand side. You can also tap the Photos row, as before. Both methods will launch the camera window ready for you to take your photos if none have already been taken. Should you see a prompt requesting PIM access to your Camera just tap OK.

If you are already editing your Notes you also have the option to take photos using the camera icon from the keyboard shortcuts (at the top of the keyboard) or the right-hand side.

Once on the camera screen, there are three options for taking photos.
Option 1 - Take one photo at a time.
Using the camera button on the right side, you will be able to take one photo at a time. Should your device have Flash capabilities (i.e. iPhone or iPad Pro) you will find it will automatically be used in dark shots. However, if you wish to force the flash to be in use for your photo you can tap the blue flash symbol (marked below on the left-hand side), which will then highlight yellow, then tap on the camera to take you shot.

Once tapped you will see a still image with a number of options on the right.

- Back/Retake - Tap to ignore this photo and take a new one.
- Use as Cover Photo - Tap to make this your cover photo on the Routine inspection finished the report or as customised in your reports.
- Attach To Report - Your photo will automatically be added to report. Tap if you still want the photo, but don't want it in the finished report.
- Add Notes - You may use this to highlight a specific issue or fault already referenced in your inspection notes. The notes will appear above the photo in the report.
- Use Photo - If you are happy with the still photo tap to save and return to the camera screen. You can now take your next photo.
- Help - General advice on taking photos.
- Include in Maintenance - If you are using the special Cleaning/Maintenance Report, or using Chintaro, you can tap to include the photo in this report. For more information, on Cleaning/Maintenance reports, contact Support.
Option 2 - Burst mode
Burst mode lets you simply point and shoot without stopping to check or add notes. Just tap the burst mode image on the left to turn this feature on. Please note that this feature is exclusive to PIM Premium accounts.

Once activated, you can then use the normal camera button on the right to take multiple photos without interruptions. The only disadvantage is that if you need to add notes or make changes to where the photo is displayed, you will need to edit them later from the area photo list. (See Viewing Your Photos below.)
Option 3 - Choose From Photo Library
You may have already taken all the property photos on the camera of your device, or imported from another device (Transfer Photos from iPhone to iPad for PIM using AirDrop). Simply tap the Photo Library button to select up to 20 photos at a time from existing photos on your iPad/iPhone.

Tap the Photo Library icon (1) on the right to bring up your camera roll. Select the photo(s) you wish to bring in (2), then tap Done (3).

In the popup PIM Photo Library box, tap Add Photos to confirm.

Taking a Great Photo
The first step towards taking a good photo is to make the area as light as possible by opening curtains/blinds or turning on the lights. There are also a number of screen options while taking the photo;
- Focus - The camera has a built-in auto-focus, but you can tap on the screen to focus on a specific area.
- Zoom - Use two fingers and spread apart to zoom in or close them together to zoom back out. Make sure you tap to focus before taking your photo
- Brightness - Tap on darker areas to brighten.
- Alignment - If your image is incorrectly displaying as portrait or landscape, rotate the iPad or iPhone in different directions a few times so the camera can get its bearings.
No Photo Limits
There are no limits to the number of photos you can take in PIM. Some reports need only a few photos, others need hundreds, (even thousands!). That's perfectly ok, but remember too many photos on your finished report will take a long time to submit, and will use a lot of ink and paper when printing.
We do give you a little warning message in the camera screen when you reach twenty photos in a row.
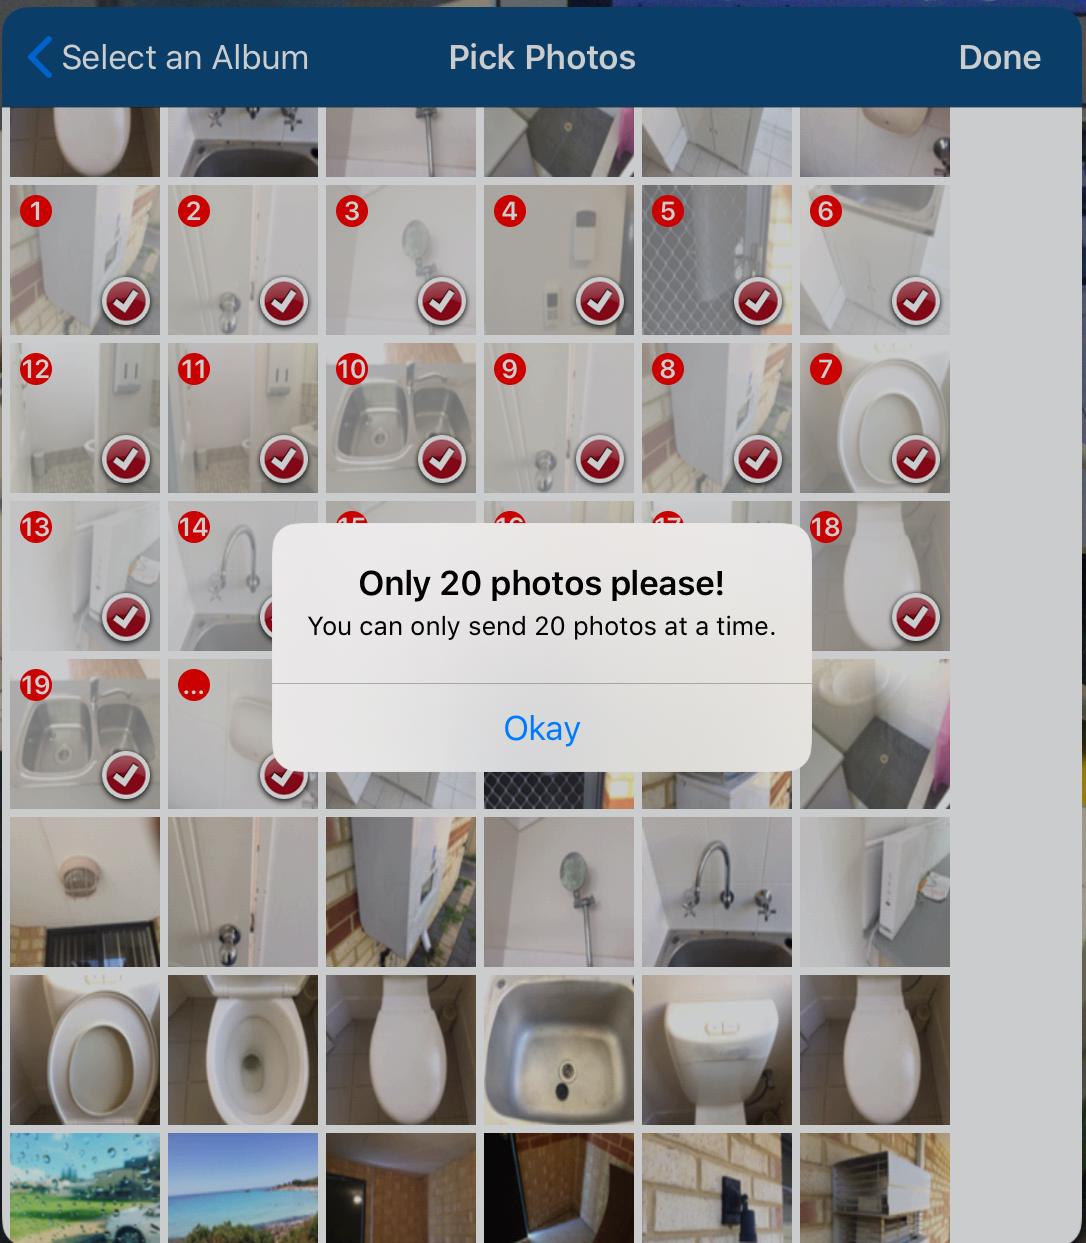
That's ok, it's just PIM asking for a moment to upload these into your inspections before you take the rest. Just tap Done and follow the prompts to take more photos.
Viewing Your Photos
Photos will be displayed in the order they were taken. From this screen you can do a number of things:

- Add Photo - Tap to add more photos.
- Edit - Tap to delete photos from the list.
- Tap Photo - Tap any photo to make changes such as adding notes. You can also use the Send Photos option on this screen to send the full-sized photo by email. You may choose this option for maintenance or marketing purposes without needing to return to the office first.
Once you have finished taking photos for the inspection area, tap on the area name in the top left to return to the main notes screen.
If you experience any difficulties taking photos, please refer to or troubleshooting guides and FAQs.