 | Using PIM With PropertyMe |  |
Thanks to our integration with PropertyMe, you can import scheduled inspections directly into PIM, complete with relevant property information and tenant details.
Once you have completed your inspections in PIM, the reports are automatically pushed into PropertyMe ready for you to complete your follow up activities.
This integration is only available to PIM Premium customers, so please contact our support team to upgrade your plan.
| Contents |
- Video Instructions
- First Time Set Up
- Prepare For a Successful Import
- Import Data Into PIM
- Complete the Inspection
- Resend Inspection to PropertyMe
- Troubleshooting
| Video Instructions |
Prefer videos to written instructions? No problem watch the video version below or visit our PIM Youtube Channel.
First Time Set Up |
The ability to import from PropertyMe relies on information in PIM Settings so it is important to know how yours is set up. You only have to do this once.
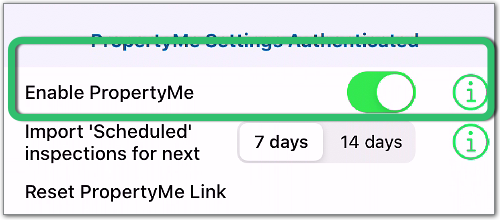
1 Enable PropertyMe Integration |
Navigate to PIM Settings > Advanced, Integrations About the App > Enable PropertyMe and tap to toggle on.
|
| 2. Authenticate PropertyMe |
| Once toggled on, you will be taken to an external PropertyMe login screen. You will be prompted to enter your Administrator's PropertyMe portfolio email and password. You will then need to enter your 6-digit Authenticator code generated from your QR code. For instructions on how to setup your Authenticator click here. The data you enter is secure and not stored in PIM. After successful login, you will see that the settings have been authenticated.  |
| 3. Turn on Quick Check Labels (optional) |
Another time-saving feature is to have the quick check labels always ticked by default. To set this default go to Settings > PIM Admin Routine or PCR inspections and toggle the 'Quick Check Always Ticked' to On position.  See the Customised Settings Guide for more information. |
| Prepare For A Successful Import |
A few extra tweaks in PIM Settings to ensure exact matches with PropertyMe fields will ensure a more successful import.
| 1. Set Up Smart Property Profiles |
| Smart Property Profiles are a way to quickly set up inspections for the most common property types of your portfolio, such as a five bedroom, three bathroom house. Your existing PropertyMe commonly Property Types can be matched to PIM Smart Property Profiles to allow for a seamless import. This will save a lot of time adding or removing rooms during the inspection. You can add or edit yours in PIM Settings > PIM Admin > Smart Property Profiles.  To set up your PIM Smart Property Profiles to match PropertyMe, see the Smart Property Profiles Guide for more information. |
| 2. Confirm Inspectors |
| Inspections can only be imported against the PropertyMe Manager if there is a corresponding Inspector name in PIM Settings > PIM Admin > Inspectors. If an exact match is not located, PIM will use the Default Inspector instead.  See the Adding Inspectors Guide for more information. |
| 3. Assign a Default Inspection Type |
During the import, PIM will use the inspection Type assigned to an inspection in PropertyMe (ie Routine, Entry or Exit) if there is a match on the default inspection type in PIM. You can assign the PIM default inspection type in PIM Settings > PIM Admin > Default settings > Inspection Type. 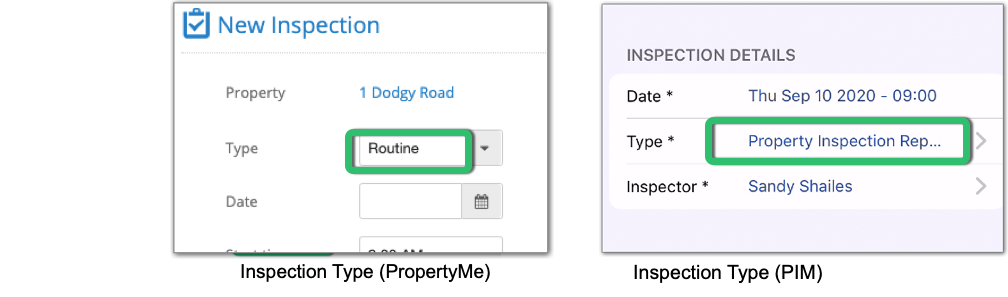 See the Inspections & Inspection Types Overview for more information. See the Inspections & Inspection Types Overview for more information. |
Import Data Into PIM |
PIM imports real-time data from PropertyMe using the import process below.
| 1. Navigate to the Import tab. |
This is at the bottom of the app.  |
| 2. Import the latest file from PropertyMe. |
Pulling down on the screen will refresh the data files. Once it appears, tap to open.  |
| 3. View imported inspections. |
| Your properties will be listed with a colour code on the left. Green indicates a property PIM has not seen before, so it will be treated as a new inspection. Orange represents an existing property so a Repeat Inspection will be created.  |
| 4. Filter and Sort if required. |
If there are a large number of properties in the imported list, you can use the Filter (1) or Sort (2) options to make things easier to view.  |
| 5. Import the inspections. |
When you are ready to complete the import, select the Action button (1) then choose one of the Import options (2).  Note: if you only want to import some, press cancel then tap against the properties you want. This will place a check on the right. You can then choose the Import Selected option instead of Import All. |
| 6. Confirm the import type. |
The import will create inspections based on your default Property Profile and Inspection Types displayed in the message. If you are happy with this, tap Continue. |
| 7. Close the PIM File Import message. |
Take note of the confirmation message then tap OK to close. |
Complete The Inspection |
After importing, your scheduled inspections will be available under the Inspections Tab.
Go ahead and complete the inspection in the usual way by adding notes and photos then Submit Inspection when done. Submitting the inspection will upload a copy of the report into PropertyMe, and the Inspection status will be updated to Complete in PropertyMe.
You will find the inspection report in PropertyMe under the Property (1), then click the Inspection from the Activity List then within Documents (2).
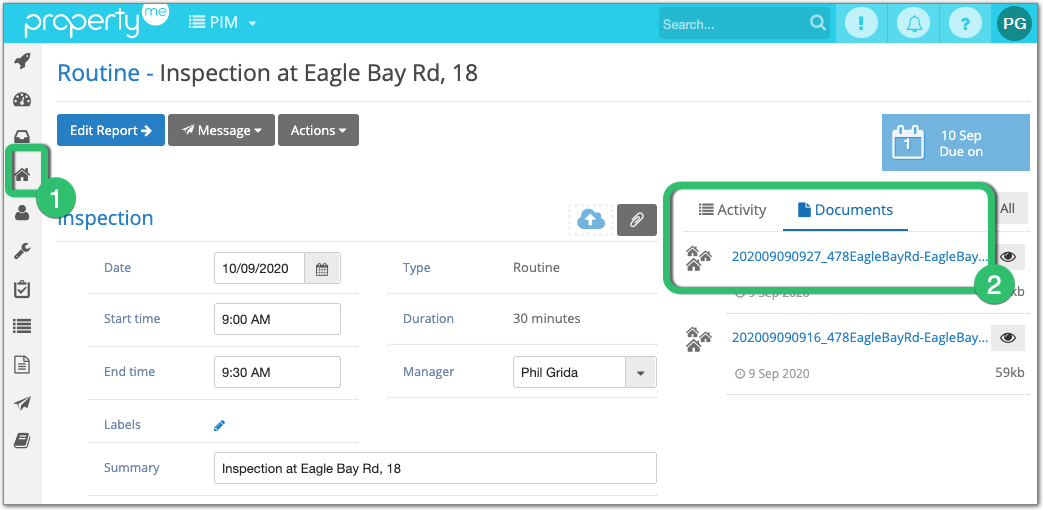
Note: Once the report has uploaded, the Inspection status does not update or change. The property manager will need to change the status manually in the PropertyMe dashboard.
Resend Inspection to PropertyMe |
If for some reason you only previewed the inspection rather than Submit, or need to re-send to PropertyMe, this can easily be done from the home screen of the inspection.
| 1. Tap the Reports Folder from the inspection. |
 |
| 2. Select Send to PropertyMe from Options. |
From Options (1) on the right tap Send to PropertyMe (2)  |
Troubleshooting |
For general troubleshooting on PropertyMe workflows, imports and uploads, refer to the PropertyMe guide or contact PropertyMe Support. (Note: you must be logged in to your PropertyMe account to access these links.)
For PIM related questions, please contact PIM Support.
Here are some common concerns and speed humps around PropertyMe integrations and how to move past them.
| 1. Submitted Inspections not uploading to PropertyMe |
| Only inspections created from an import can be uploaded automatically into PropertyMe. This includes Routine/Tenant/Cleaning and Property Condition Reports. See the Uploading Reports Into PropertyMe for manual upload instructions. |
| 2. Lease Dates not populating into PIM |
| Lease dates in PIM are populated via the Agreement Start and End dates in PropertyMe not the Move In and Out. |